 |
| Before |
 |
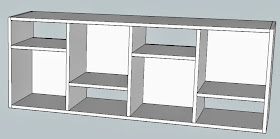
| The original design |
As usual, we started with SketchUp. First we copied the design:
We went to Discount Builders Warehouse, where we planned to buy the lumber, to make sure they had wood that would fit the design, and liked their 3/4" pine.
To better attach the shelves to the vertical boards (and for better aesthetics, if we could do it right), we decided to route 1/4" grooves for the shelves. SketchUp makes it easy to create "components" out of repeating pieces, and create a layer of rulers that can be turned on and off.
Once we liked the design, we could copy the whole thing and separate it to create a cut list. (We tried using the Cut List plugin, but it's not very intuitive and this worked just as well.)
With our cut list we went back to the store to buy the lumber. Unlike with the kitchen counter, when we carried lumber on the bus, this time we needed much larger boards, so we rented a car.
With each project, we have a reason to buy a few more tools. This time we added a saw horse and drill guide. Our parking space (under our porch, enabling a dangled extension cord) again doubled as our carpentry shop.
Over several weekends, we sawed, sanded, drilled, routed...
... assembled...
... primed, painted, and finished...
I wanted to attach the vertical boards to the top and bottom using dowels. Our precision gets a little better on each project, but it's still not perfect. So at the end everything was just a tiny bit off, enough to prevent it from being assembled perfectly. Taking out most of the upper dowels and trimming some of the rear boards made it all fit. The 1/4" shelf grooves, some dowels, eight screws on the sides securing the top and bottom, rear boards flush on all four sides, and flat metal braces screwed into the back make it very structurally sound.
And finally, our new media cabinet!
The store might have under-charged us a little for the lumber, because we got all of it for around $50. Not including new tools, the lumber, paint and miscellaneous parts for the project cost around $100. Factor in the value of appreciating your own well-done work and that's a pretty great value.
- Ben


No comments:
Post a Comment
All comments are moderated before publishing. Comments with links (unless directly relevant to the post) will not be approved. No spam, please.